Eyedropper

Picks up the color beneath the cursor when you click on the image. The border changes to the clicked color, which also appears in the Color box on the Borders pane so that you can adjust it if you open the Color dialog box.
The eyedropper is not available when you are using a texture.
Border
Size
Sets the size of all the sides of the border simultaneously. Drag the slider left and right to adjust the width of the border. You can also type in a different number or use the up and down arrows to change the size of the border.
The text below the Size field shows the final size of your image with the border added. The final size changes dynamically as you adjust the size of the border.
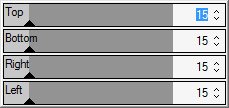
Advanced size controls
Opens a fly-out of advanced size controls. Use the sliders, up- and down-arrow keys, or type in a number, to set the size of each side of the border individually. For example, you can set the bottom border to be larger to include a space for copyright information. Click on the arrow beside the Size slider to open the advanced size controls menu.

Color box
Activates when you select the Color radio button.
Do any of the following:
- Click on a color in the image to make the border that color. The clicked color appears in the Color box.
- Click on the color in the middle of the Color box to open the Colors dialog, where you can adjust the color in multiple ways.
- Click the down-arrow beside the box and hover over the quick-color box until you find a color you like. When you click inside the quick color box, the picked color appears in the Color box and the border changes to the selected color.
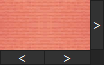
Texture box
Activates when you select the Texture radio button.
Do any of the following:
- Click the side arrow to open the texture library and view thumbnails of textures to select.
- Click the forward and back arrows to browse through the textures one at a time, without opening the library.
Edge
Straight
Sets the edge of the border to be a straight line.
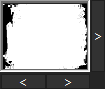
Irregular
Activates when you select the Irregular radio button.
Do any of the following:
- Click the side arrow beside the edge box to open the edge library and view thumbnails of edges to select.
- Click the forward and back arrows to browse through the edges one at a time, without opening the library.
Edge blur
Blurs the edges of the edge of the image into the border. Drag the slider to the right to increase the blur, or to the left to decrease the blur.
Edge effects
Drop shadow
Adds a drop shadow to the image that appears to lift it off the page. The drop shadow appears behind the image, between it and the border. You can adjust the depth of the blur on the edge of the shadow, and the transparency of the shadow, which affects how much of the border shows through the shadow. You can also change the direction of the imaginary source of light by dragging the glow on the Light Source ball.
- Blur: Adjusts the blur on the edge of the shadow when you drag the slider.
- Opacity: Adjusts the transparency of the drop shadow when you drag the slider.
Raised
Adds a raised edge to the image that appears to raise it above the border, giving it a 3D look. The raised effect is applied to the image, between it and the border. You can change the direction of the imaginary source of light of the raised edge by dragging the glow on the Light Source ball. You can also adjust the size, strength, and color of the raised edge in the following ways:
- Size: Drag the slider to the right to increase the size of the raised edge so that it appears higher. The greater the size the more rounded the effect.
- Strength: Drag the slider to the right to increase the 3D effect of the raised edge.
- Colored: Select this option to apply the border color to the raised edge.
Light Source
Activates when you click either the Drop shadow or Raised checkboxes. Click and drag the glow on the ball to reposition the imaginary light source for the 3D effect of the Drop shadow or Raised edge effects.