You are here: Edit Mode > Adjusting Exposure/Lighting Tools > Adjusting Lighting
Adjusting Lighting
You can use the Lighting tool to adjust areas in an image that are too dark or too light, without affecting other areas of the photo. You can also simultaneously lighten dark areas that are too dark, and darken areas that are too bright. Examples would be a photo of a person silhouetted against a bright background like the sea, or a window. In fact, most photos taken on a dull day, or with a flash, can be improved in various ways with fine adjustments.
You can save your settings as a preset for future use.
The Lighting tool is very versatile. There are 4 tabs — each allows you to achieve results in different ways. In addition, there are several keyboard and mouse shortcuts that allow you to make adjustments on specific areas of the photo itself.
- 1-Step tab: For an instant, effortless exposure adjustment.
- Basic tab: Is for very quick and easy adjustments using three sliders. ACDSee Pro analyzes the photo and varies the adjustment throughout the image automatically. For example, darker images are brightened more. By clicking the Auto button, you can have ACDSee Pro fully analyze the photo and set the slider positions automatically. You can also click directly on an area of the image to generate automatic settings optimal for that area, (usually the subject of the photo).
- Light EQ tab: Works like a sound equalizer but with light. You can adjust the brightness and contrast of different tone bands (areas of relative brightness or darkness) of the image independently using a slider for each tone band. A graph shows the amount of brightening or darkening applied throughout the tonal range. The gray areas in the graph are suggested boundaries for adjustment to avoid clipping and loss of detail, and turn red to indicate where you have adjusted the sliders far enough to cause clipping.
- Advanced tab: Gives you ultimate control of the brightness and contrast in an image. Basic adjustment curves can be constructed using four sliders, and you can manually adjust the curves by clicking and dragging within the graph area or on the image itself.
To Open the Lighting Tool:
In Edit mode, in the Exposure/Lighting group, click Lighting.
Using the 1-Step Tab
When you open an image in the Lighting tool, 1-Step automatically adjusts your image's exposure. You can further adjust it using the Amount slider. To return to the 1-Step automatic adjustment, press the Reset button.
Using the Basic Tab
To Add Light to Dark Areas:
- Drag the Highlights slider to the right to add light to the dark parts of the photo.
- Adjust the settings using any of the controls in the table below.
To Darken Areas That Are Too Bright:
- Drag the Shadows slider to the right to lighten and return detail to areas that are too dark.
- Adjust the settings using any of the controls in the table below.
To Adjust Midtones That Are Too Light or Dark:
- Drag the Midtones slider to the right to lighten and return detail to areas that are too dark.
- Adjust the settings using any of the controls in the table below.
Lighting Controls
|
Right-click on a slider
|
Right-click on a slider to reset it.
|
|
Exposure Warning
1.png)
|
Click the Exposure Warning to make any overexposed or underexposed areas visible. Overexposed pixels turn red, underexposed pixels turn green. You can also toggle Exposure Warning on and off momentarily by holding down the E key.
|
|
Auto
|
Click to allow the software to analyze the photo and apply optimal settings based on the amount of light and dark pixels in the photo. Darker photos are brightened more than photos that are already bright.
|
|
Done
|
Click to apply your changes and close the tool.
|
|
Cancel
|
Click to discard all changes and close the tool.
|
Click Reset to clear your changes and reset to default settings. If you saved your changes, you cannot reset your settings. If you want to discard only the Edit settings, select File | Restore to Developed.
Using the Light EQ Tab
|
|
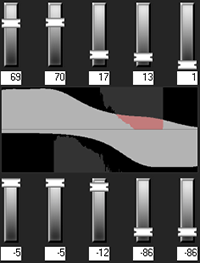
The Light EQ tab has two sets of sliders. The top set is for brightening. The lower set is for darkening. The dark-to-light gradient on each slider indicates that you brighten that tone band when you move the slider up (top row of sliders) or darken that tone band when you move the slider down (bottom row).
Between the two sets of sliders are two horizontal bars graded from black to white. These bars indicate that sliders on the far left affect the dark tonal bands. The sliders on the right affect light tonal bands. Moving a slider changes the light in that particular tonal band.
In the middle of the bands are two graphs that change as you adjust the sliders to represent the amount of darkening and lightening throughout the tonal range of the image. The two gray graphs show the maximum amount of brightening or darkening that you can apply before clipping begins. If you push a slider too far, the clipping is shown in bright pink.
|
To increase contrast within a tonal band, apply brightening and darkening simultaneously in equal amounts by dragging the upper and lower sliders up and down, respectively. The area between the top of the upper graph and the bottom of the lower graph indicates the amount by which contrast is increased.
To Use the Light EQ Tab:
- Do one of the following:
- Drag the tone band sliders up or down depending on which light bands you want to adjust.
- Type the exact number into the number boxes or increment the numbers to make precise adjustments.
- Click the # Tone drop-down list to increase or decrease the number of tone band sliders.
- Click (or press E) to see any overexposed or underexposed pixels.
- Click the Auto button to apply settings automatically.
- Drag the Darkening slider to darken the light areas of the image.
- Drag the Contrast slider to increase the contrast in the image.
- Drag the Fill Light slider to lighten dark areas of the image.
- Left-click and drag upwards to brighten the dark areas of the photo. Try to prevent clipping (shown in pink on the graph).
- Right-click and drag downwards to darken the bright areas of the photo. Try to prevent clipping (shown in pink on the graph).
- Click Done to apply your settings and close the tool. Or click Cancel to discard your changes and close the tool.
Using the Advanced Tab
|
|
Sliders
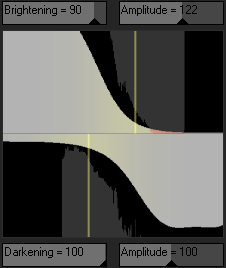
The Advanced tab has two sliders for brightening and two for darkening. The Brightening and Darkening sliders control the shape of the adjustment curves, while the Amplitude sliders control the height of the curves.
The more you brighten or darken, the more you increase the balance of the dark against the light areas in the image. The Amplitude sliders increase the intensity of the effects of brightening or darkening.
The Scale slider at the bottom of the tool adjusts the overall adjustment sensitivity to local variation in brightness. Moving this slider to the left makes the adjustment more sensitive to smaller areas of brightness variation, which may be beneficial in some images. For most images, however, leaving the slider in the default position gives the best result. You can also adjust the Contrast slider to decrease or increase contrast, or use the Fill Light slider to lighten dark areas of the image.
|
Graphs
Between the Brightening and Darkening controls are two gray graphs that indicate the maximum amount of lightening or darkening that you can apply before clipping (shown as bright pink) begins.
Two colored curves appear and change as you drag the Brightening, Darkening and Amplitude sliders - these curves indicate the amount of brightening and darkening applied throughout the tonal range of the image. Darker tonal areas are on the left, and brighter tonal areas are on the right. As you move your cursor over the image, a vertical line in the graph indicates the tone level of the area under the cursor within the tonal range. At times there are two lines because the tone levels for brightening and darkening are not necessarily the same. This is because brightening is sensitive to maximum color values while darkening is sensitive to minimum color values.
The Advanced tab is unique in that you can adjust the curves manually, either on the graph itself, or on the actual photo. Adjustments made on the photo are reflected in the curve on the graph. Adjustments made on the graph are reflected on the photo.
To increase contrast within a tonal range without changing the brightness, apply brightening and darkening simultaneously in equal amounts by dragging the upper and lower curves up and down, respectively. The area between the top of the upper graph and the bottom of the lower graph indicates the amount by which contrast is increased.
To Use the Advanced Tab:
- Do one of the following:
- Drag the Brightening or Darkening sliders to adjust the bright or dark pixels. As you drag, a gray curve appears to indicate your adjustments.
- Left-click and drag upwards to brighten the dark areas of the photo. Try to prevent clipping (shown in pink on the graph).
- Right-click and drag downwards to darken the bright areas of the photo. Try to prevent clipping (shown in pink on the graph).
- Drag the Scale slider to the right to make your adjustments more sensitive to smaller areas of brightness variation.
- Drag the Contrast slider to increase or decrease contrast in your image.
- Drag the Fill Light slider to add light to the dark areas in your image.
- Make adjustments using any of the options in the table below, including on the image itself.
- Click Done to apply your settings and close the tool. Or click Cancel to discard your changes and close the tool.
Adjustment Options - Advanced Tab
|
Area
|
Action
|
Result
|
|
Sliders
|
Drag Brightening
|
To the right: Increases the lightening applied to the darker areas.
To the left: Applies brightening more uniformly to all areas of the image.
(The name of the slider changes to Custom curve when you change the curve manually or make adjustments on the image.)
|
|
Drag Darkening
|
To the right: Increases the darkening applied to the brighter areas of the image.
To the left: Applies the darkening more uniformly to all areas of the image.
|
|
Drag Amplitude (Brightening)
|
To the right: Increases the intensity of the brightening across all areas of the image. The height of the curve increases.
To the left: Reduces the intensity of the brightening and the height of the curve.
If the Amplitude slider is 0 - no brightening is applied.
If the Amplitude is 100 - 200, the proportional amount of clipping increases.
In most cases it is not necessary to adjust amplitude.
|
|
Drag Amplitude (Darkening)
|
To the right: Increases the intensity of the darkening across all areas of the image. The height of the bottom curve increases.
To the left: Reduces the intensity of the darkening and the height of the curve.
|
|
Drag Scale
|
To the left: Makes the tool more sensitive to smaller areas of brightness variation.
This means that smaller areas can be adjusted independently. Generally the default scale of 10 gives the best result, but if an image contains small details that need brightening, a lower scale might give better results.
|
|
On Graph
|
Drag the graph (top)
|
The graph changes as you left-click and drag up on the graph itself. The graph represents the brighten adjustments you are making. The dark gray graph represents the maximum amount you can drag the graph before clipping (pink) begins.
The height of the graph represents the level of brightening applied at each tone level. (Tone moves from black on the left to white on the right.)
When you make direct brightening or darkening adjustments on the graph or image, the corresponding Brightening or Darkening slider changes to Custom curve. If you adjust the position of the slider after this it discards all direct curve adjustments.
When you make direct brightening or darkening adjustments on the graph or image, the corresponding Brightening or Darkening Amplitude slider changes to indicate the current curve amplitude.
|
|
Drag the graph (bottom)
|
The graph changes as you right-click and drag down on the graph itself. The graph represents the darken adjustments you are making. The dark gray graph represents the maximum amount you can drag the graph before clipping (pink) begins.
|
|
You can use all the shortcuts below that apply to the image, directly to the Graph itself.
|
Changes the tonal band on the graph itself with a corresponding change in the image. This is useful for making fine adjustments to a specific tonal band.
|
|
On Image
|
Double-click with left mouse button
|
Automatically sets Brightening to optimum for that area of the image. A brighter area (e.g. a face) works best.
|
|
Double-click with right mouse button
(or SHIFT + double-click with left mouse button)
|
Automatically sets the Darkening to optimum for that area of the image.
|
|
CTRL + double-click with left mouse button
|
Increases the amount of brightening around that tone level while decreasing the brightening in the rest of the image.
Use this method to quickly brighten a specific subject or area to bring it out of the image.
|
|
CTRL + double-click with right mouse button
|
Increases the amount of darkening around that tone level while decreasing the amount of darkening in the rest of the image.
|
|
Scroll up or down with the mouse wheel above the image
|
Increases or decreases the amount of brightening applied at that tone level in the image. Both the image and the graph show the changes.
|
|
SHIFT+ scroll with the mouse wheel above the image
|
Decreases or increases the amount of darkening applied at that tone level in the image.
|
|
Hold down "A"
+ scrolling or
+ dragging with the left mouse button
|
Sets the brightening Amplitude slider directly.
|
|
Hold down "A" +SHIFT
+ scrolling or
+ dragging with the right mouse button
|
Sets the darkening Amplitude slider directly.
|
|
Click and drag up and down on the image (left mouse button)
|
Increases or decreases the amount of brightening applied at that tone level in the image. Both the image and the graph show the changes.
(Only works if the image is actual size - no zooming.)
|
|
SHIFT + click and drag up and down on the image (left mouse button)
|
Decreases or increases the amount of darkening applied at that tone level in the image.
(Only works if the image is actual size - no zooming.)
|
You can right-click a slider to reset to the default value.
You can use the Edit Brush  to paint this effect onto specific areas of your image.
You can use the Gradient tool  to transition this effect across specific areas of your image.
You can use the Radial Gradient tool  to apply effects around, or directly to, a center point.
See Also: