After completing all of your image corrections using the non-destructive tools in Develop, take your image into Edit to apply finishing touches to your image. In Edit, use the pixel-based editing tools such as red eye removal, special effects and many other tools and combine it with the Selections tool to fine tune your image.
When you take an image through Develop or Edit, the original is never altered. Changes you make are saved to a separate file, so that you can revert to the original or the developed version at any time. To understand more on how changes are saved, see How ACDSee Pro saves changes to images.
To Edit an Image:
You can apply adjustments to specific tones or colors with Pixel Targeting.
You can discard your Edit settings and revert to the Develop or the original settings for your image. For steps to revert your image, see Restoring originals and develop settings.
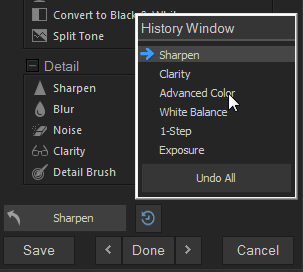
Using the Edit Mode History Window:
You can use the Edit mode History Window to view the sequence of changes you have made to your image. You can also use the History Window to jump around in your editing sequence and revert back to a previously-applied adjustment. For example, if you applied a series of adjustments, such as color adjustments, followed by sharpening, and exposure tweaking, but you want to revert back several steps to the state your photo was in with just the color adjustment, you would use the Edit mode History Window.
To return to a specific adjustment, select the Edit mode History Window arrow at the bottom of the Edit mode panel, and select your desired adjustment. You can select any adjustment in the list, or select Undo All to undo all of your adjustments.
While editing an image, you can adjust the magnification with the zoom controls, located in the bottom right corner.
|
Histogram
|
Displays the histogram preview for the current image. The histogram provides a graphical representation of the intensity level of pixels within each color channel. Spikes at either end of the graph indicate clipped colors. Keeping the histogram open is particularly useful when adjusting exposure, as the histogram reflects all adjustments as you make them. You can also display the Histogram as a separate window by selecting View, and then Histogram. |
|
Undo/Redo
|
Undo to discard all changes made on the current tab. Redo to return to the options that you had selected prior to clicking Undo. In Edit, Undo and Redo buttons display the changes you can undo or redo. |
|
Reset
|
Click on the Reset button to reset the image to its default settings. |
|
Display Full Screen
|
Displays the image on a full screen. Press F to view full screen and to return to Develop. |
|
Actual Size
|
Returns the current image to its actual size. |
|
Navigator Pane
|
Automatic Window: When Automatic Window is enabled, the Navigator pane appears as soon as you zoom in on a photo. Drag your cursor to the section of the image you would like to see magnified. Release the cursor to settle on an area of the image. Right-click on the Navigator pane to switch from Automatic to Manual. Manual Window: When Manual Window is enabled, you can view the Navigator pane by selecting the Navigator icon. Right-click on the Navigator icon to switch from Manual to Automatic. |
|
Fit Image
|
Reduces the image to fit within the Edit mode area. |
|
Show Saved |
Toggles the changes on or off, to compare the current image to the last saved version. |
|
Zoom slider
|
Increases the size of the image if you drag it to the right, decreases the size if you drag to the left. |
|
Zoom drop-down list
|
Displays a list of zoom sizes to select. |
.png)


 The Navigator icon only appears when the image is magnified or if the Actual Size icon has been clicked. Click and hold the Navigator icon to display a small duplicate of your image. Then drag your cursor to the section of the image you would like to see magnified. Release the cursor to settle on an area of the image.

